Introduction
Here are the high-level mechanics for creating a micro workshop with a big ROI:
- Pick the hottest topic for your audience
- Validate your idea with your audience(s)
- Decide on the date / price / title for your micro workshop
- Configure your simple tech
- Your simple promotion strategy
- Preparing your micro workshop presentation
- Going live with your micro workshop
- Your simple follow-up strategy
Pick the hottest topic for your audience
The hottest topic for your audience members is where you solve an acute micro problem they are experiencing.
This is where your personal and audience work from Steps 1 and 2 come into play. You should have a list of problems or goals with which your audiences struggle.
Validate your idea with your audience(s)
After you’ve chosen a topic, your next step is to validate the idea with your audiences. These include your audiences on social media or your list of subscribers. If you have neither, you can reach out manually via DM to people who represent your ideal audience.
Validation is straightforward.
Create a post (or send an e-mail / DM) with any of these prompts.
- I am considering doing a workshop on how to do [this thing]. It would be about an hour and at this [price]. Comment below if you are interested.
- I just achieved [this goal, win or transformation] in my business. Would you be interested in a quick workshop where I break down the process to achieve [this goal, win, transformation]? It would be [price]. DM me if this is of interest.
We state the price up front as a filter. You want folks to raise their hand knowing that it is a paid workshop.
Communicate with those who raise their hand. Thank them and let them know you’ll send out the details soon. You can also solicit questions on the topic so as to cover them in the workshop.
Two further observations:
#1 – You should be authentic in this exchange. If you have built a good relationship with your audience, you won’t need the hard sell that is typical of traditional marketing.
#2 – You decide what is a positive response. Even a workshop with five participants will give you invaluable experience and allow you to begin cultivating true fans.
Decide on the date / price / title for your micro workshop
If you receive a positive response, choose a date for your workshop no later than 7-10 days after validation. You don’t want to lose momentum.
Afterward, complete these steps:
- Choose a price that feels like an impulse buy for your audience. I have seen micro workshops priced from $7 – $97 depending on the topic and the expert. Again, if you are selling a regular workshop, you can start at $100 and go up from there.
- Create a short title for your workshop. For example, The anatomy of a compelling and high-converting e-mail.
- Publish another post / send another e-mail or DM the day after validation. Let your audiences know about the workshop and that a registration page is forthcoming. Include a teaser on the content of the workshop to generate more interest.
Configure your simple tech
A micro workshop is low-tech and requires few digital assets. Here are the tasks to complete and the programs we recommend. Feel free to substitute what you already use:
- Create a Zoom event for your workshop with a registration link. (Pro Tip: Set the event to record automatically so you don’t forget on the day of the workshop.)
- Create a Paypal button for your workshop.
- Create a simple sales page (in Google Sheets even) and include the Paypal link
The sales page includes:
- The name of your workshop
- Three strategies / principles / ideas your audience will learn by participating
- Details on the date and time.
- How to register for the event (including Paypal button link)
- Any brand identification (logo, website, etc.)
- (Optional) Additional principles you will teach
You can see an example of a simple sales page here. If you click on the Paypal link inside, you can see how I configured the button.
NOTE: This was a previous educational brand I owned which I have since discontinued.
Finally, do not overcomplicate this part.
Do not waste hours / days on setting up fancy software and sales pages. All of that is secondary and often masks the real culprits: fear or procrastination.
It’s vitally important that you get your ideas out as quickly as possible and iterate later.
Ultimately, what matters is 1) the trust your audience has in you and your expertise, and 2) whether the problem you solve is acute enough for your audience to act.
Your simple promotion strategy
Once you have your tech ready, send an email to everyone who commented or replied to your post. Share your excitement and provide the link to your sales page. You will need to repeat this process for any new signups leading up to your workshop.
If you have an autoresponder, you can program an automatic e-mail to go out with the Zoom details. Otherwise, you will need to e-mail these details manually to each person.
For promotion, here is the simple strategy. Over the next three days create one post or email per day with any of the following elements:
- Share one strategy / tactic / principle that you’ll be covering in the workshop and how that will benefit your participants.
- Share a testimonial or a result you have achieved with the concepts in the workshop.
- After you have prepared an outline (see next step), send an image of the first page to generate more interest.
- Include a link to your sales page to let people know where they can sign up.
Preparing your micro workshop presentation
Two days prior to your workshop, begin preparing an outline of your presentation including a slide deck.
Here again, do not stress or overcomplicate the process. Below is a simple outline that will help you organize your thoughts, and provide the template for your slides:
- Introduction to your workshop – This is where you welcome everyone, state the topic of the workshop, and the benefit / solution / transformation your participants can expect.
- Introduce yourself and your credentials, and a quick story of how this topic has been helpful for you or your clients. This should be very brief.
- Highlight the 3-5 action steps you will cover in your presentation. This will provide a roadmap for your participants.
- The majority of your presentation should be the action steps that are required to solve the acute problem you have highlighted. Thus, for each action step, explain the idea, explain how to use it, then show examples to illustrate the action step.
- SUPER DUPER CRITICAL: Do not go into theory or long explanations. You want folks to come away with actionable tasks that will provide a micro win.
- Review and summarize the action steps. Provide links to additional resources that will help your peeps take action.
- Finally, share how your participants can get further training or help from you. The easiest way is to mention the next problem your audience would want to solve AFTER the workshop. For example, for the email workshop, I could mention trainings on creating a conversational magnet or a lead gen chatbot.
Creating the Slide Deck
Now, take your outline and create the following slides:
- Title of the workshop
- Introduction to the workshop with promise of outcome
- Self-introduction with personal story
- Overview of action steps
- For every action step create four slides: Action step title, definition, how-to, illustration / example
- Review and summary with link to resources
- Further training
- Q & A inviting questions
Do not spend an inordinate amount of time on graphics, colors, templates, and the usual secondary considerations. Folks are coming to hear you, not be impressed by your visual design.
Quickly run through your presentation and slides. Practice sharing your screen and ensure that your camera and microphone are working properly.
Finally, don’t forget to keep promoting your workshop via social media posts and e-mails. Also, don’t be afraid to reach out manually to folks that might be interested in the topic.
Going live with your workshop
On the day of your workshop, send a final e-mail a few hours before the start. Include the date and time, Zoom details, and a reminder of the benefits for attending.
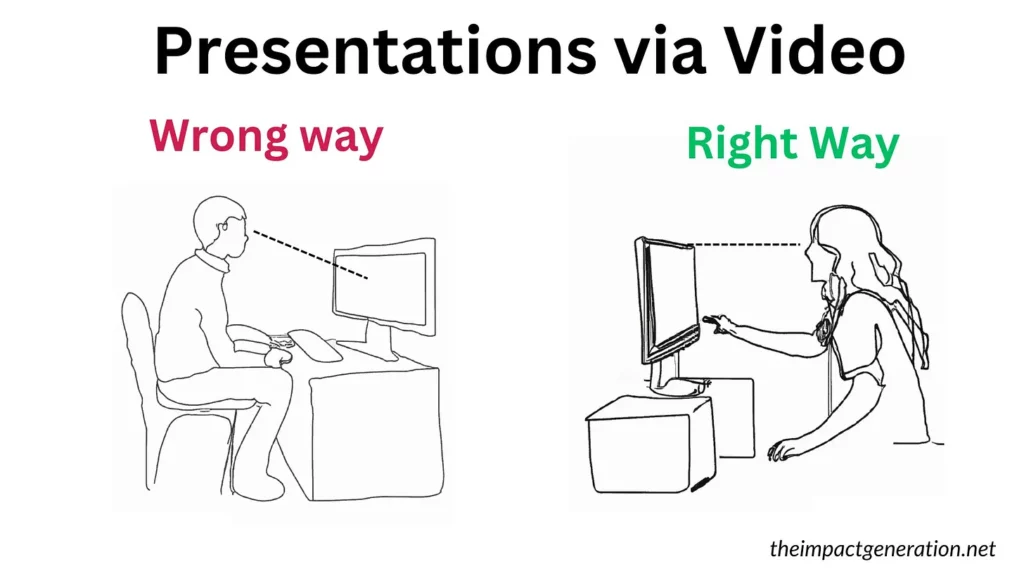
About 15 minutes before the workshop, setup your presentation space. Make sure you have plenty of light. Position your camera at eye level (see diagram above). Place your notes where you can see easily see them. Launch your presentation and leave it open in the background.
- About 10 minutes before you presentation, launch your Zoom session. This will begin the recording which you will later edit. If you forgot to set automatic recording, click record now. Turn off your microphone and video on Zoom.
- PRO TIP: Change the Zoom view to Gallery. Then pin your video. This will allow you to see the participants but keep them out of the recording.
- Welcome everyone who joins early.
- Begin your workshop on time. Do not wait for stragglers. Respect the participants who showed up promptly.
- For a brief minute (without switching to your slide deck) welcome everyone to the workshop. Be natural, smile and show enthusiasm. Make folks feel comfortable.
- Explain the logistic of the workshop. Tell folks you want to spend the maximum amount of time on the content so they should write down their questions. Inform them of the Q & A session at the end, and the fact that the workshop is being recorded and will be available a day or so after the workshop.
- Start sharing your screen with the presentation and move through your slide deck. Try to look directly at the camera and not at your slides. Over time, this will become more natural.
- When you are done with the content, make sure you have shared how folks can get additional training and help from you.
- Announce the Q & A time and give folks the option to leave. Then, open it up for questions and make sure to document them so you can improve your training or next workshop.
Your simple follow-up strategy
After the workshop (max one day), follow these steps:
- Edit the video to remove the first part of the recording. That is where I would stop editing. Making a video perfect can take hours of your time. It is not necessary. You gave a live presentation, so it should feel authentic and dynamic.
- Store the video in Google Drive, Dropbox, or a video hosting platform you already use and grab the link.
- Send out a follow-up e-mail to everyone who registered for the workshop. Thank them for coming. Include a link to the video. Also, use this email to remind folks of how they can get additional training or help from you.
- BONUS IDEA: Create 30, 60 and 90 second videos of the most salient points of your workshop. Now you have valuable and actionable content that you can share as needed.
Iterate, Improve, Then Diversify
Creating and delivering on your workshop is going to make you feel like Superman or Superwoman. It’s a great feeling.
Now you have confidence, data, and clients, and you are well on your way.
This is what we call the seed of a great online business. From here you should iterate and improve on your workshop. You can sharpen the presentation and improve or create better supporting materials.
If you delivered a micro workshop, consider expanding to a regular workshop with more content. Repeat the process one or two more times to dial in the process and the workshop content. Once you are confident in your product, now it’s time to diversify.
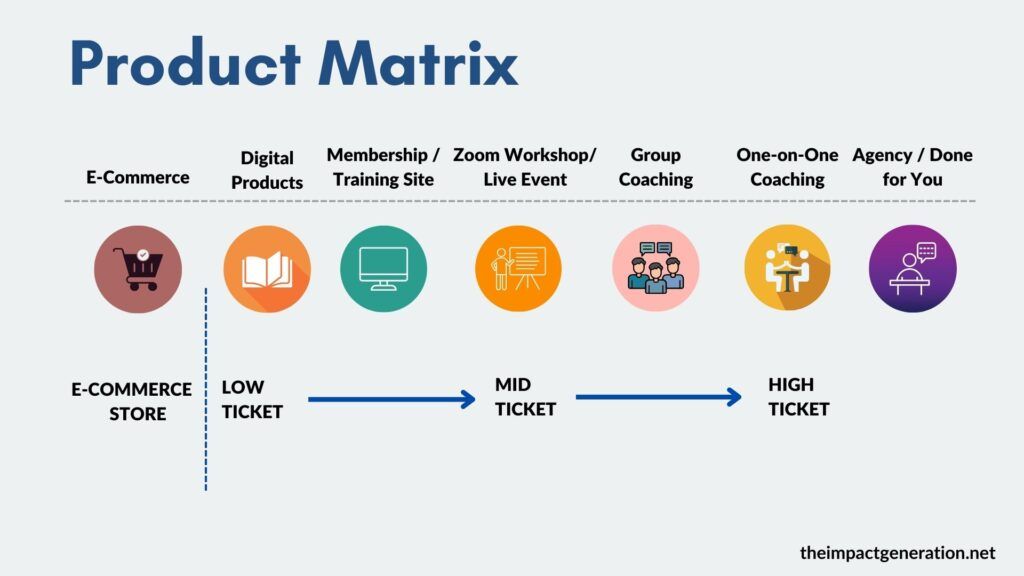
Here is the Product Matrix graphic again.
If you have created and delivered a successful workshop, take the recording, and turn it into a full-fledged digital product. Include the recording and supporting materials.
Next, consider creating a mentorship or cohort high-ticket program. These are high value products since you are personally mentoring a group of people through a 6-8 program.
The beauty of the previous workshops (apart from the experience you will gain) is that some of those participants will want to join your high-ticket mentoring program.
You Are One Workshop Away
We’ve come full circle. As you can see our One Workshop Away model has tremendous benefits, and little downside, especially when compared to traditional online business models.
We restate the benefits here from our first chapter:
- You are one workshop away from being able to discover your purpose and mission. (This is Step 1)
- You are one workshop away from being confident in yourself, and the skill set you can offer the world. (This is Step 1)
- You are one workshop away from validating the economic viability of your business idea. (This is Step 3)
- You are one workshop away from launching your business with data, experience, and confidence. (This is Step 3)
If you’re going to live a life of purpose, or a self-actualized life, a life outside of the domain of culture, or society has handed down to you, you’re going to have to create your own economy.
The digital economy and our simple model gives you that opportunity.
We want to help you recover the amazing abilities, talents and gifts you have inside, and which the world needs today. We believe you have a duty to let those things shine, and to make a difference in people’s lives, and in the world.
We are counting on you.
One Workshop Away Community
If you need help or guidance with these steps, I want you to head over to theimpactgeneration.net/owa-mentoring. That’s where you’ll find on how you can join our community. You’ll receive video training plus weekly coaching help to implement everything in this guide. And you won’t have to break the bank.
We’d love for you to join us in this adventure.
Take care.
And here’s to your success.
Gustavo
